こんにちは!のせっち@nosecchi01です。
pugを使って効率よくコーディングをするために必要なファイル構成を考えました。
Pugの導入
Pugを導入するにはGulpを使います。
Gulpの使い方は、別記事または、noteの方に詳しく書いています。
本記事では基本のセットアップは割愛しているので、初めてGulpを触る方は別記事の方を先に読んでみてください。
本記事はGulp初心者には少し難しい内容です。

node.jsが前提となるのでインストールしておきます。
pugを使うだけなら、gulpとgulp-pugの2つのパッケージのみでOKです。
npm i -D gulp gulp-pugconst { src, dest } = require('gulp');
const pug = require('gulp-pug');
const compilePug = done => {
src(['./src/pug/**/*.pug', '!./src/pug/**/_*.pug'])
.pipe(pug({
pretty: true
}))
.pipe(dest('./dist'));
done();
};
module.exports = {
pug: compilePug,
};内容を簡単に説明すると、
- srcが入力先(src / pug)を指定
- *_.pugはコンパイルしない
- destが出力先(dist)を指定
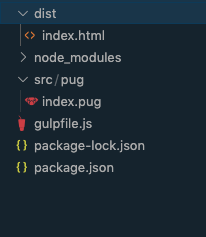
src/pug/index.pugを作成します。
(srcフォルダ、その中にpugフォルダ、更にその中にindex.pugファイル)
とりあえずコンパイルしてみたいので、最低限の記述をしていきます。
doctype html
html(lang="ja")
  head
    meta(charset="UTF-8")
    meta(http-equiv="X-UA-Compatible", content="IE=edge")
    meta(name="viewport", content="width=device-width, initial-scale=1.0")
    title Document
  body
    h1.hoge-pug Hello from pug!
ここまでできたらコンパイルします。
npx gulp pugdistフォルダ内にindex.htmlができます。中身は下記のようになっているはずです。
<!DOCTYPE html>
<html lang="ja">
  <head>
    <meta charset="UTF-8">
    <meta http-equiv="X-UA-Compatible" content="IE=edge">
    <meta name="viewport" content="width=device-width, initial-scale=1.0">
    <title>Document</title>
  </head>
  <body>
    <h1 class="hoge-pug">Hello form pug!</h1>
  </body>
</html>
下記のようなフォルダ構成になります。
pugのレイアウトを作る
pugのようなテンプレートエンジンは、ただhtmlと同じように使っていてはもったいなくて、テンプレートを作って使い回すことで威力を発揮します。
この辺はNuxtに似ています。というか僕はNuxtに寄せた構成にしています。

layouts/_default.pugという名前のフォルダを作成して下記のように記述します。
block value
include ../_config
doctype html
html(lang="ja")
  head
    include ../head/_meta
    include ../head/_favicon
    include ../head/_stylesheet
    include ../gtm/_gtmHeadTag

  body
    include ../gtm/_gtmBodyTag

    block header

    block main

    block footer
block, includeとかが出てきていきなりよくわからない感じになったと思うのですが、わからないままでいいので付いてきてください。実際にコピペで動かしてみるといいかと思います。
includeのするファイルの解説
pugではincludeを使ってファイルの読み込みが可能です。わかりやすいのでいうとheaderやfooterなどですが、役割ごとにもっと細分化してincludeしていきます。
僕のdefault.pugでは下記のファイルをincludeしています。
- _config.pug
- head/_meta.pug
- head/_favicon.pug
- head/_stylesheet.pug
- gtm/_gtmHeadTag.pug
- gtm/_gtmBodyTag.pug
includeする際は.pugは省略可能です。
各ファイルに何を書いているかを解説していきます。
_config.pug
_config.pugにはcssやjsへのpathとか、各種情報をまとめておきます。
- const cssPath = path + "/css/";
- const jsPath = path + "/js/";
- const imgPath = path + "/img/";
- const domain = "https://www.sample.com/"
- const gtmId = 'GTM-A4B4CDE';
- const ogImage = domain + "img/ogp.jpg"
- const twitterDomain = "domainName"
- const facebookAdmins = "7777777777777777"
- const facebookAppId = "88888888888888888"

include mixin/_picture
ここで定義した変数は今後何回も出てきます。
gtmIdというのは、Google Tag ManagerのIDです。GTM-から始まります。案件によってはGTMではなくGA(Google Analytics)だけかもしれませんね。その辺りは適宜変更してください。
ここでさらにmixin/_picture.pugを読み込んでいます。pictureタグは便利なタグですが、毎回全部書くのは面倒なのでmixinに書いておきます。
mixin picture(className, imgName, extension, altName)
  picture(class=className)
    source(srcset=imgPath + imgName + "." + extension, media="(min-width: 768px)",)
    img(src=imgPath + imgName + "-smp" + "." + extension, alt=altName)
mixin pictureを定義しておくと+picture(className, imgName, extension, altName)で使い回すことが可能です。
下記のような感じ。
+picture("class名", "file名", "jpg", "画像の説明")コンパイル後
<picture class="class名">
  <source srcset="./img/file名.jpg" media="(min-width: 768px)"/>
  <img src="./img/file名-smp.jpg" alt="画像の説明"/>
</picture>
head/_meta.pug
metaタグはボリュームが多いし、重複が多いので纏めておくと便利です。
先ほど_config.pugで定義した変数もチラホラ入っています。
title、description、keywordsなどは、各ページで定義します。
meta(charset="UTF-8")
meta(http-equiv="X-UA-Compatible", content="IE=edge")
meta(name="viewport", content="width=device-width, initial-scale=1.0")
meta(content="IE=edge", http-equiv="X-UA-Compatible")
//- Title
title #{title}
//- Required Meta Tags
meta(name='description', content=`${description}`)
meta(name='keywords', content=`${keywords}`)
meta(property="og:title" content=`${title}`)
meta(property="og:type" content="website")
meta(property="og:url" content=`${domain}`)
meta(property='og:locale', content='ja_JP')
meta(property="og:site_name" content=`${title}`)
meta(property="og:description" content=`${description}`)
meta(property="og:image" content=`${ogImage}`)
//- twitter
meta(name="twitter:card", content="summary_large_image")
meta(name="twitter:site" content="website")
meta(name="twitter:domain" content=`${twitterDomain}`)
meta(name="twitter:title" content=`${title}`)
meta(name="twitter:description" content=`${description}`)
meta(name="twitter:image" content=`${ogImage}`)
//- facebook
meta(property="fb:admins" content=`${facebookAdmins}`)
meta(property="fb:app_id" content=`${facebookAppId}`)
head/_favicon.pug
faviconをまとめておきます。
link(rel="apple-touch-icon" type="image/png" href="apple-touch-icon-180x180.png")
link(rel="icon" type="image/png" href="icon-192x192.png")
head/_stylesheet.pug
cssをまとめておきます。
link(rel="stylesheet", href=cssPath + "style.css")
if location == 'about'
  link(rel="stylesheet", href=cssPath + "page/about/style.css")
if location == としているところはページ毎にcssの読み込みをしたい場合に使います。
locationの出しわけは各pugファイルで行う必要があります。(後ほど解説します)
gtm/_gtmHeadTag.pug、gtm/_gtmBodyTag.pug
GTMタグはheadとbodyの2箇所書かないといけないのでそれぞれファイルを作成します。
GTMの埋め込みタグは、GTMの管理画面で生成されたものをコピペするわけですが、実はGTM ID以外は共通です。
script.
  (function(w,d,s,l,i){w[l]=w[l]||[];w[l].push({'gtm.start':
  new Date().getTime(),event:'gtm.js'});var f=d.getElementsByTagName(s)[0],
  j=d.createElement(s),dl=l!='dataLayer'?'&l='+l:'';j.async=true;j.src=
  'https://www.googletagmanager.com/gtm.js?id='+i+dl;f.parentNode.insertBefore(j,f);
  })(window,document,'script','dataLayer', '#{gtmId}');
noscript
iframe(src=`https://www.googletagmanager.com/ns.html?id=${gtmId}` height="0" width="0" style="display:none;visibility:hidden")_config.pugで定義しておいたgtmIdがここに入ります。
index.pugの解説
includeするファイルの準備ができたらいよいよindex.pugを作っていきます。
その前に再度_default.pugを振り返りましょう。下記のように書いていました。
block value
include ../_config
doctype html
html(lang="ja")
  head
    include ../head/_meta
    include ../head/_favicon
    include ../head/_stylesheet
    include ../gtm/_gtmHeadTag

  body
    include ../gtm/_gtmBodyTag

    block header

    block main

block footerindex.pugではこのblockにあたる場所に入る部分を書いてあげればいいです。
blockを置いているのは下記です。
- block value
- block header
- block main
- block footer
extend layouts/_default
append value
  - const title = "トップページのタイトル | Site Name";
  - const description = "トップページのディスクリプション";
  - const keywords = "キーワード,キーワード2,キーワード3";
  - const path = ".";
  - const location = "top";

block header
  include components/layout/_header

block main
  include components/project/_swiper
  include components/component/_accordion
  include components/component/_scroll-top

block footer
include components/layout/_footer1行目のextend layouts/_default で_default.pugを使うよ、という宣言をしています。
2行からのappendはブロックに後から追加できるもの、という感じで捉えてください。
_meta.pugで定義だけしていたtitle, description, keywordsなどはここでappendしたものが追加されます。
path = "."はファイル階層です。LP1枚なら問題にはならいないですが、下層ページがある場合、階層が一つ深くなるのでcss、js、画像などのパスを合わせるためにこの定義が必須です。
location == "top"としているのは、ページによる出しわけなど条件分岐のために使います。
(_stylesheet.pugで使いましたね。)
あとは、block headerにheaderを、block footerにfooterを、それ以外をblock mainにincludeすればOKです。
block headerには基本的にheaderだけしかincludeしないし、block footerには基本的にfooterしかincludeしないと思います。
block mainにswiperとかaccordionとか書いているのは一例です。ここに各セクションのコンテンツが入っていくイメージです。
各コンポーネントのディレクトリ構成はNuxtとFLOCSSを参考に
『各コンポーネントのディレクトリ構成』というのはどういうことかと言うと、
components/layout/_headerとかcomponents/project/_swiperとかのファイル分けをどう行っているか?という話です。
Nuxtでは各コンポーネントはcomponentsフォルダに入れることになっています。
なので、全てのコンポーネントはcompoenntsフォルダにまとめることにします。
「Nuxt知らんし、意味わからん…。」となっているかもしれませんが、最後にディレクトリ構成を全部お見せするので、今はなんとなく理解でOKです。
コツとしては、index.pugにコードを直接書かないことです。index.pugではincludeしかしません。
componentsの中身はFLOCSSで分類します。
僕はcss(scss)はFLOCSSで書いていて、scssのディレクトリ構成はfoundation, layout, project, component…としているので、pugも同じ構成にします。
といっても、foundationはないので、layout, project, componentの3つだけです。
ここはアトミックデザインで作った方がいいと考える人もいるかもしれません。

下層ページを作る
下層ページ/aboutを作ります。
about/index.pugを作成します。
extend ../layouts/_default
append value
  - const title = "アバウトのタイトル | Site Name";
  - const description = "アバウトのディスクリプション";
  - const keywords = "キーワード,キーワード2,キーワード3";
  - const path = "..";
  - const location = "about";

block header
  include ../components/layout/_header

block main
  include ../components/project/_swiper
  include ../components/component/_accordion
  include ../components/component/_scroll-top

block footer
  include ../components/layout/_footer
appendでtitle, description, keywordsページ毎に変えられることがわかります。
path = ".."としています。aboutは一つ階層が深くなっているので、pathを合わせないとcss、js、画像などが読み込まれません。
location = "about"としています。_stylesheet.pugでの条件分岐と合致してpage/about/style.cssが読み込まれます。
できあがるディレクトリ構成
以上でできあがるディレクトリ構成は下記のようになります。

まとめ
・pugを使ってレイアウトの作成やコンポーネント化することで効率よくコーディングできる。
・スッキリ見通しのいいindex.pugを作ることができる。